Sometimes, the user interface requires us to change the status of a
field, depending on the status of another field. For example, if the
user marks the Show filter checkbox, another field, Filter, appears or becomes enabled. In standard Dynamics AX forms, this can be done using input control event modified(). But sometimes such features are required on dialogs where handling events is not that straightforward.
Very often, I find myself in a
situation where existing dialogs need to be adjusted to support events.
The easiest way of doing that is of course to build a form in AOT, which
will replace the original dialog. But in cases when the existing dialog
is complex enough, probably a more cost effective solution would be to
implement dialog event handling. It is not as flexible as AOT forms, but
in most cases it does the job.
In this recipe, we will
create a dialog very similar to the previous one, but instead of
entering the customer number, we will be able to select it from the
list. Once the customer is selected, the rest of the fields will be
filled automatically by the system from the customer record.
How to do it...
1. In AOT, create a new class named CustSelect with the following code:
class CustSelect extends RunBase
{
dialog eventdialog eventhandlingDialogField fieldAccount;
DialogField fieldName;
DialogField fieldGroup;
DialogField fieldCurrency;
DialogField fieldPaymTermId;
DialogField fieldPaymMode;
}
public container pack()

{
return connull();
}
public boolean unpack(container packedClass)

{
return true;
}
protected Object dialog()

{
Dialog dialog;
DialogTabPage tabGeneral;
DialogTabPage tabDetails;
DialogGroup groupCustomer;
DialogGroup groupPayment;
;
dialog = super();
dialog.caption("Customer information");
dialog.allowUpdateOnSelectCtrl(true);
tabGeneral = dialog.addTabPage("General");
fieldAccount = dialog.addField(
typeid(CustAccount),
"Customer account");
fieldName = dialog.addField(typeid(CustName));
fieldName.enabled(false);
tabDetails = dialog.addTabPage("Details");
groupCustomer = dialog.addGroup("Setup");
fieldGroup = dialog.addField(typeid(CustGroupId));
fieldCurrency = dialog.addField(typeid(CurrencyCode));
fieldGroup.enabled(false);
fieldCurrency.enabled(false);
groupPayment = dialog.addGroup("Payment");
fieldPaymTermId = dialog.addField(typeid(CustPaymTermId));
fieldPaymMode = dialog.addField(typeid(CustPaymMode));
fieldPaymTermId.enabled(false);
fieldPaymMode.enabled(false);
return dialog;
dialog eventdialog eventhandling}
public void dialogSelectCtrl()

{
CustTable custTable;
;
custTable = CustTable::find(fieldAccount.value());
fieldName.value(custTable.Name);
fieldGroup.value(custTable.CustGroup);
fieldCurrency.value(custTable.Currency);
fieldPaymTermId.value(custTable.PaymTermId);
fieldPaymMode.value(custTable.PaymMode);
}
static void main(Args _args)

{
CustSelect custSelect = new CustSelect();
;
if (CustSelect.prompt())
{
CustSelect.run();
}
}
2.
Run the class, select any customer from the list, and move the cursor
to the next control. Notice how the rest of the fields were populated
automatically with the customer information:

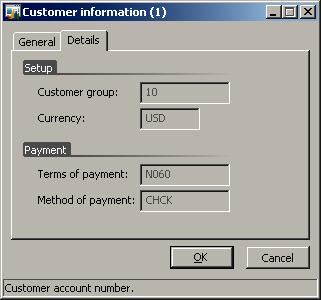
3. When you click on Details tab page, you will see the details as in following screenshot:
How it works...
The new class CustSelect is a copy of CustCreate from the previous recipe with few changes. In its declaration, we leave all DialogField
declarations. We remove all other variables apart from Customer
account. The Customer account input control is the only editable field
on the dialog, so we have to keep it for storing its value.
The methods pack()/unpack() remain the same as we are not using any of their features.
In the dialog() member method, we call allowUpdateOnSelect() with the argument true to enable input control event handling. We also disable all fields apart from Customer account by calling enable() with parameter false for every field.
The member method dialogSelectCtrl() of the RunBase
class is called every time the user modifies any input control in the
dialog. It is the place where we have to add all the required code to
ensure that, in our case, all controls are populated with the correct
data from the customer record, once the Customer account is chosen.
Static main() method ensures that we can run this class.
There's more...
Usage of dialogSelectCtrl()
sometimes might appear a bit limited as this method is only invoked
when the dialog control loses its focus. No other events can be
controlled, and it can become messy if more controls needs to be
processed. Actually, this method is called from the selectControl() of the form, which is used as a base for the dialog.
As mentioned earlier, dialogs created using the Dialog
class are actually forms, which are dynamically created during runtime.
So in order to extend event handling functionality on dialogs, we
should utilize form event handling features.
The Dialog
class does not provide direct access to form event handling functions,
but we can easily access the form object within the dialog. Although we
cannot create the usual event handling methods on runtime form controls,
we can override this behavior. Let's modify the previous example to
include more events. We will add an event on the second tab page, which
is triggered once the page is activated. First, we have to override the dialogPostRun() method on the CustSelect class:
public void dialogPostRun(DialogRunbase dialog)
{;
dialog.formRun().controlMethodOverload(true);
dialog.formRun().controlMethodOverloadObject(this);
super(dialog);
}
Here, we enable event
overriding on the form after it is fully created and is ready for
displaying on the screen. We also pass the CustSelect object as argument for the to make sure that form "knows" where overridden events are located. controlMethodOverloadObject()
Next, we have to create the method that overrides the tab page event:
void TabPg_2_pageActivated()

{;
info('Tab page activated');
}
The method name
consists of the control name and event name joined with an underscore.
But before creating such methods, we first have to get the name of the
runtime control. This is because the dialog form is created dynamically,
and Dynamics AX defines control names automatically without allowing
the user to choose them. In this example, I have temporary added the
following code to the bottom of dialog(), which displayed the name of the Details tab page control when the class was executed:
Now, run the class again, and select the Details tab page. The message should be displayed in the Infolog.